Saturday, October 26, 2013

Halloween Wtich Hat Sucker Holders


My friend came over today and we made these cute little wtich hat sucker holders.  I think they turned out so cute.  They were really easy also.  The hardest part was the bow.  I have the hardest time getting bows to look right.  I need someone to come and teach me!  :-)  LOL.  Overall though, we made a dozen of these pretty quickly.  We took them to some ladies in our church and had some for our kids' school and music teachers.  Just a cute little "Thank You" gift.   I believe the file was an SVGCuts files.  The orange paper is several years old and is Halloween double sided.  I bought a whole pack of it and am still using it.  LOL.

http://pileitonchallenge.blogspot.com/2013/10/pile-it-on-42-halloweenday-of-deadcute.html
www.2creativechicks.com/2013/10/challenge-7-halloween.html
http://www.craftindesertdivas.com/2013/10/halloween-linky-party.html
http://creativecuttingchallenge.blogspot.com/2013/10/challenge-21-halloween-not-card.html
http://shoppingourstash.blogspot.com/2013/10/sos-124-halloween-or-orange-black.html
http://doubleclickconnections.blogspot.com/2013/10/for-my-husband-loving-you-card-new.html anything goes with a stamp
http://clearitoutchallenge.blogspot.com/2013/10/boo-come-check-out-our-challenge-and.html orange paper


Posted by Picasa


Friday, October 18, 2013

Vinyl Faced Pumpkin


This year was fun.  We were carving pumpkins and I decided to use vinyl.  A little while ago, I got the pumpkin file from Little Scraps of Heaven Designs and new it would make a cute face on my real pumpkin not to mention the pieces I can make to scrap the page with!  LOL.  Anyway, here is my pumpkin using these patterns for my pumpkin.  I think it turned out cute not to mention easy peasy and not as messy.  Gotta love that!

Posted by Picasa

Friday, September 13, 2013

Bear Card


Since I decided to make a few cards for my stash since I haven't scrapbooked anything in months, here's another card I made.

http://aninkysituation.blogspot.ca/2013/09/linky-party-8-teddy-bears.html use a teddy bear
Die Cutting Divas Teddy Bear
http://redcarpetstudiochallenge.blogspot.com/2013/09/rcs-52-anything-else.html anything goes


Ginger Girl Birthday Card


Here's another cute little Birthday Card.  These little gingers are so cute.  They came from KaDoodle Bug Designs and I love them.

http://seizethebirthday.blogspot.co.uk/2013/09/seize-birthday-with-toppings.html Birthday Card
http://www.pinkcricut.com/2013/09/link-tuesday-57/ link party
http://creativecuttingchallenge.blogspot.com/2013/09/challenge-18-anything-goes.html anything goes
http://redcarpetstudiochallenge.blogspot.com/2013/09/rcs-52-anything-else.html anything goes


Girly Gingerbread Card


I haven't scrapped anything in forever so I decided to jump back in and make a couple of cards.  So here is my cute little gingerbread card.  Isn't she just the cutest.  She came from KaDoodle Bug Designs.  I decided to enter it into these challenges....

Peachy Keen Stamps Challenge Sketch
Little Scrap Pieces Link Party
http://justbcreativecrazy.blogspot.com/2013/09/september-just-because-linky-party.html Link Party
http://dianamlarson.blogspot.com/2013/09/dlart-thankful-thursday-september-linky.html link party
http://paperplaytime.blogspot.com/2013/09/ch-18-use-3-different-papers.html 3 different papers
http://redcarpetstudiochallenge.blogspot.com/2013/09/rcs-52-anything-else.html


\

Thursday, June 27, 2013

Photo troubles.....


Since I was having trouble with the photos on the Pentax forum, I decided to post here for the day so people could see and comment on the photos!  Thanks....sorry... not sure why it didn't work from the forum but I appreciate your time to comment and help!!!!  I also posted my post below the pictures if it helps so you aren't bouncing back and forth....


Hi.  I recently purchased my first dslr a Pentax K-x and I have a couple of questions.  I have had really good results with macro photos with nice bokeh but I am struggling with portraits.  I bought my camera to learn to take professional like photos of my kids....only I'm not having good luck.  Often, they are blurry.  I've attached a couple that I have taken for you to see and offer any tips.... if I attach a photo here, can you see the exif info to look at the settings I used so you can give me pointers.  I've seen amazing photos shot with this camera but I have a lot to learn.  I took a class that moved me from auto mode to AV and so I have been playing with the settings AV and ISO but some of my outdoor photos in midday on a cloudy day take ISO 800 to 1600???  That doesn't seem right....on a outdoor day if the ISO is that high, what kind of photos will I get in a gym or inside?  

I have single point focus on, continuous focus selected,  image stabilization on,  and I've been centering my subject within the bracket in the viewfinder and yet it is sharper at other points than the middle section I have focused on.  I've been waiting for the little image stabilization light and also the focus light to come on before shooting and still not in foucs.  Not sure what's happening.  I would appreciate your help and thoughts if you have a minute to help a newbie.  (Thanks!)

Image 1:  Photo 1 is of 3 people.  ….. kits lens 18-55,  F11, 800, dark and no one really in focus…..  Do I need to go up to f13 or 16 and down on the iso then?  I guess I just can't figure out why all these photos are so dark.

Image 2:
The second image is actually taken with a 50mm 1.7 lens manual focus lens  at 5.6, auto WB, ISO 800 and yet it's so dark AND out of focus.  It was a cloudy day, but this was taken at around 2 or 3 in the afternoon and it was NOT dark....  The rocks behind him are in focus but he is way out of focus and yet I had the bracket set on his face????  It seems that if I have several feet behind my subject, my photos are more in focus, but how do I get an in focus photo when the person is next to a wall or rocks like in this case?

Image 3:  The car appears to be in focus, but not the girl?  These settings were f6.3, ISO 200, auto WB, center weighted.  Once again the car behind her is focused like above on the rocks, but not the person....  and yet I've used 2 different lenses and gotten the same results.

In all 3 photos, the time of day and lighting were very similar and yet I have 2 at ISO 800 and one at 200 and they are all darker than they should be?

Image 4 was taken and the buffalo is still a little out of focus....I think this one is because I had it set at f4, ISO 200 and probably a 7.1 would be better?  Yes/No?  I took several of him and they are all about the same.

Image 5 was a ground squirrel....locked in on him in the center of the frame and he's out of focus also.   He's at f7.1 and ISO 800....I took several of him also and they are all still slightly out of focus???

What am I doing wrong?  I would love your thoughts and ideas as this is what I purchased the camera for.

I have taken tons of macro shots with the different lenses and a few of birds and I've gotten some really good shots (some not so good either but that's to be expected)  but people are not working for me.

Would love to hear your insights!  Thanks so much!

Friday, May 10, 2013

Happy Mother's Day Card 2


Here's another Mother's Day Card.  Very similar to the first one, but a little different.  :-)

http://littlescrappieces.blogspot.com/2013/05/fun-friday-mothers-day-challenge.html Mother's Day

Posted by Picasa

Thursday, May 9, 2013

6th Grade Graduation Layout


Here's my layout for my daughters graduation.  I love thes little birds.  They are so fun!  I'm entering it into the Pumpkin Spice Challenge.  :-)

http://pumpkinspiceblog.blogspot.com/2013/05/nsdthings-with-wings-challenge-with.html things with wings


Posted by Picasa

Toolbox Layout


Ok...I've had these photos sitting around for a while and decided to get them done so a challenge is just what I needed.  So .... one page done and one challenge entered.  :-)

http://pumpkinspiceblog.blogspot.com/2013/05/nsd-lets-catch-up-layout-challenge-with.html
Posted by Picasa

It's Your Day Card


I had some leftover pieces from my Mother's Day cards so I decided to make a "It's Your Day" card for my Grandmother.  Since she's not my "mother" I titled it, "It's Your Day!"  I love using my stash and my scraps....a win, win every time!  I hate the old grey stamps....I can never get them straight, probably because I had to cut them myself and the bottom isn't straight....hence my crookedness.... Kinda like the "There was a crooked man who had a crooked house...." anyone remember that story!  LOL.  Have a happy day!

http://divasbydesignchallenge.blogspot.com/2013/05/anything-goes.html anything goes
http://cutecardthursday.blogspot.com/2013/05/challenge-268-something-blue.html blue
http://pumpkinspiceblog.blogspot.com/2013/05/agnes-nsd-post-challenge.html Mother's Day
http://delightfulsketches.blogspot.com/2013/05/weekly-challenge-stash-it.html stash it
http://dianamlarson.blogspot.com/2013/05/dlart-thankful-thursday-challenge-109.html flowers


Posted by Picasa

Another example of how I use extra piecings on different layouts


If you read my last post, I was commenting on how I choose to buy patterns and why.  If you want to read it, scroll down.  LOL.  This is another example of how I use extra piecings on different projects.  If you look at all these cute bunnies, you will notice that they are all from the same set used in different ways with different poses and sometimes different faces.  I used these bunnies to make a "Coloring Eggs" layout alone with a "You are Somebunny Special" and several cards.  I used a gray paper which I don't use often so I didn't have any scraps on hand and so since I always try to cut as many as possible as would fit on my paper, I had lots of bunnies hopping around my work station.  LOL.  Here's how I used them!  See how the layouts are different but that I used the same piecings?  Just FYI, the bunnies actually came from a Valentine's set and yet I didn't use them on a Valentine's Day layout at all.  I switched out the hearts and added eggs instead.  Anyway.... just another example on how to use the same pattern differently.  Enjoy!
Posted by Picasa

Wednesday, May 8, 2013

Using my scraps....


Since we are on the topic of my conversation with my friend the other day, she also wanted to know how I found the time to scrapbook as each layout takes forever to create from scratch.  Besides cutting several piecings at one time, another trick that I try to use is to use my scraps.  I scrapbook 8.5 x 11 as you can see from the pictures.  That means that for every page that I do, I have a left over piece of 3.5 by 12 and a 1 by 8.5.  So to help use those, I try to keep all my scraps from a paper pack together and to cut borders out of the leftovers.  If you look closely at these pages, you will notice that they are all from the same paper stack and that the borders are all from the "background" of another page.  So basically, if I cut my long extra pieces into borders, then I will have them ready for another page and any leftover other pieces that I have, I can use for titles and embelishments that match the pages.  This helps use my scraps AND keep my pages color cordinated and saves time when I'm actually scrapping.  Hope this helps someone!  Have a great day!
Posted by Picasa

Tuesday, May 7, 2013

Happy Mother's Day Card


Here's one of the cards that I ended up with for Mother's Day.  The flower is from Miss Kate's Cuttables but it's a pretty common flower.  I actually have a quickkutz die very similar to it.  Glad to finally have these done as Mother's Day is fast approaching! 

http://shoppingourstash.blogspot.com/2013/05/sos-100-mothers-day-or-pink.html Mother's Day
http://celebratetheoccasion.blogspot.com/2013/05/challenge111-april-winner.html Mother's Day
http://partytimetuesdays.blogspot.com/2013/05/ptt119-mothers-day.html Mother's Day
http://craftspotbykimberly.blogspot.com/2013/05/monday-post-96-for-mom.html for Mom - there prize this time is the CUTEST set of stamps EVER!!!!  I love them!  I'm crossing my fingers AND toes!
http://scrappyfrogschallenge.blogspot.com/2013/05/free-choice-challenge.html free choice
http://pileitonchallenge.blogspot.com/2013/05/pile-it-on-18-for-mother.html Mother's Day
http://challenges4everybody.blogspot.co.uk/2013/04/challenge-19-anything-goes.html anything goes
http://myshericrafts.blogspot.com/2013/04/my-sheri-crafts-challenge-109-mothers.html Mother's Day
http://lovetocreatechallenge.blogspot.com/2013/05/challenge-64-for-mom-or-special-lady.html Mom
http://dianamlarson.blogspot.com/2013/04/dlart-thankful-thursday-challenge-108.html Mother's Day
http://www.scrappymoms-stamps.blogspot.com/2013/05/terrific-tuesday-challenge-mothers-day.html Mohter's Day
http://pumpkinspiceblog.blogspot.com/2013/04/winner-announcements-challenge-19.html flowers
http://thepinkelephantchallenge.blogspot.com/2013/05/the-pink-elephant-challenge-tpe198.html Mother's Day
http://www.twistedtuesdaychallenges.blogspot.com/2013/04/2tc49-fifth-tuesday-free-for-all.html free for all


Posted by Picasa

What I look for when I purchase patterns....


I had a friend who is on a tight budget ask me what I looked for when I purchased patterns so the next couple of posts are going to be some tips that I use to stretch my scrapping budget and to make my scrapping time go faster.  Now this is just personally how I do it and I know everyone is different but.... I have thousands of files that I can cut and create with.... honestly.... more than I will ever use but when I'm tempted to buy a new file or even use one that I have this is what I do.  The first thing is when I cut any pattern, I make several of the same piecings and just change up their faces or embelishments to use them in different ways.  I do this to use up the paper so that I don't have lots of little pieces left over....so I make as many as possible with the paper sizes that I have...depending on paper size, usually 3 to 5 piecings.  Almost all of my paper piecings are cut out of leftovers from some other project.  So when I purchase a file, I try to buy a character, animal or whatever that I can use on more than one layout or card so even if a cute set comes out with more bears and I love it.....if I already have a bear file that I love, I will often pass on it and buy a bunny file or girl file or something that I don't have so that I can switch it up a bit with accessories.  If you look at most of the sites that sell files, often the animals/piecings are the same....just different embelishments for the accents so if I have a bunch of similar files, I will pass and make my own set.  For example, a cute bear holding a shamrock will also be a cute bear holding a heart for Valentine's Day or egg for Easter or a sand bucket for a day at the beach.  So I buy the file for the animal/piecing and switch out the accessory to one that I already own and can create a very similar look.

Then my friend wanted to know if all my pages are redundant.... the answer is not really.  For starters, I am behind in my scrapbooking and so even if I use a pattern more than once, the chances are that it won't even be in the same year or the same book so it doesn't really matter and two, having these extra piecings on hand allows me to create several different projects more quickly.  For example, if you look at the pictures above, you will see three completely different projects using the piecings that I made all at once.  Notice the bear card....I only had enough room on the paper to cut a little more so I choose the head and arms allowing me to create a peeker file and this is how I used it.   So if you look closely at these bears, even though they "resemble" each other, they are in fact separate bears that I have put together.  Some of their faces are even different....depending on my mood as I finished them  So.... my tip for the day is always cut how many pieces you can on the paper size you are using and then you will have them on hand for other pages or cards.

So what do I do with all these pieces left over from my project, well I store them in a photo album with each set in a different sleeve so that I can "see" what's in there and how it might be used on my layout or card with the colors that it is made from.  If you wander through my blog, you will notice several projects with several different piecings....that's how I do it.  I usually don't make "all" those piecings at one time....that would take forever for one layout, but by creating extras every time I do make a pattern, it allows me several to put on different layouts.  I'll post another post on how to make quick pages/borders from the scraps of one layout to use on another using 1 paper stack.   Anyway, just thought I'd answer her question here in case anyone else wondered.  Have a great day!
Posted by Picasa

Wednesday, May 1, 2013

Old Dresser Makeover


Ok....so all over the internet, I have been hearing about a product by General Mills called Java Gel Stain.  I have some kitchen cabinets in  a cabin that I want to do and so I was intrigued by this product so I got online and found out that a local store actually carries this it so off I went.  Now, not wanting to tackle such a huge project as a kitchen without knowing anything about how it would turn out, I got an old door and played with it.  Then one day I got this brilliant idea to try it on an OLD dresser that was actually my husbands Grandmother's that we were given 20 years ago.  I've hated this dresser for 20 years ..... I hated the color, the chips, the knobs, EVERYTHING so a long time ago, my husband bought me a new dresser but we kept this one around for storage.  Eventually when the kids arrived, it ended up in the nursery to hold all the baby items and it has just stayed there every since.  Afterall, it's not in my room.....and we all know how hard kids can be on things.....well, I decided that it was the perfect time to either help this dresser or pitch it to the trash and get a new one if I made it worse somehow!  So I decided to tackle it.  It really was a simple process and was faster than I expected.  The verdict is still out on whether or not I will do the kitchen cabinets because I want to see if this product "stays on" when abused by a 10 year old who never closes the drawers on his dresser.  If it holds up to him, it will easily hold up on the kitchen cabinets!  LOL.  I even kept the same hardware and spray painted it chrome but I can tell already that is only a temporary fix....just attachhing the knobs the color was coming off but for now, it looks 10 times better than it did!  Any one else ever tackle one of these projects?  I really liked the process, but if I were to do it over again, I would use a satin finish poly instead of semi-gloss.  I just happened to have semi-gloss on hand and didn't want to go out to buy anymore.  I only bought a quart of this stain and I'm sure I have enough to tackle that kitchen project if I decide to.  All in all, it's a nice pretty brown color and went on fairly easily.  The only concern I have with doing the kitchen cabinets, is that at the top of the dresser where the "grain" changes on the sides (you can see in the above picture), it left a little rough type finish I could never get just right.  I'm not sure anyone but me would notice and if I had used a sock instead of foam brushes, it might not be there at all, but......it is there if you look.  I'm also not sure this finish will "stay" on, but that's not because of the product....this dresser had almost like a thin layer of coated plywood paneling type finish that just wasn't your normal finish on a piece.  Because of that, I wonder if it will eventually rub off?  I was afraid to sand to much because it would take that fake finish down to an uneven wood/glued finish so.... I'll give it a couple months and see what happens.  That gives me time to see how it wears until summer.  I don't want to tackle a kitchen until  I can open doors and windows for ventilation.  Overall, I think this dresser looks better now than in the last 20 years I've owned it and my son LOVES it so we just need to finish the rest of his room now! 
Posted by Picasa

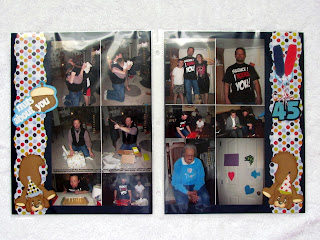
Nuts About You Birthday Layout


It seems that I am always behind on birthday layouts and so today I thought I'd get these 3 birthday ago pictures done!  Yikes!  LOL.  Anyway, I had these little squirrels left over from my husbands 12 days of Christmas and decided to use them on a "Nuts About You" birth day layout.  Simple but done!  LOL.  I like the little hats that I added to the squirrels to turn them into little birthday squirrels. Not horribly manly, but it will have to do!  These once again are some of my new Peach Keen Faces!  This is the Medium Tear Bear set.  Love those eyes!  The little squirrels are from the cute set from Designs on Cloud 9!  Her files are adorable also and I love these guys!